Wednesday, October 6, 2010
Flower arrangements: How to create a fall flower arrangement
HowdiniGuru | December 04, 2008
http://www.howdini.com/howdini-video-...
Bring the reds and oranges of autumn inside to create a beautiful fall arrangement. Floral and interior designer Rebecca Cole makes her harvest arrangement using branches and flowers.
How to create beautiful fall flower arrangements
Here's some ideas from floral and interior designer Rebecca Cole for turning branch arrangements into big and beautiful flower arrangements for a buffet or entryway:
1. Start by adding the tallest and most dramatic flowers. Delphiniums are a great choice. First, take off all the leaves on the stem so the water will reach the bud better and keep the flower lasting longer.
2. Cut the stem with a paring or pocket knife at a diagonal before placing the flower into your floral arrangement. You want the most beautiful part of the flower to be at eye level, so make sure the flower stem isn't too long.
3. Remember that the branches should be the tallest thing in the arrangement, taller than the flowers because that's how they naturally grow outdoors.
4. Add a second kind of flower to the arrangement: a less expensive lisianthus is complimentary to the delphinium. Again, remove any leaves on the stem and cut at a diagonal before arranging.
5. Next, add a kale to the arrangement. It's actually a vegetable, but opens up like a flower when you open up the head. Remove the leaves from the stem and cut at a diagonal. The kale stem is very thick so a paring knife should be used.
6. Finally, a flower with a smaller head creates a nice contrast to the big kale, long delphinium, and lazy lisianthus. The small petals of a carnation will create that extra little pop.
These floral arrangements should be about 5 feet tall from the bottom of the vase to the tops of the branches and will last about a week.
Keywords:
fall flower arrangement
fall floral arrangements
fall floral arrangement
flowers arranging
Category:
Howto & Style
Tags:
arrangement arrangements cole create design fall floral flower flower arrangements flower arrangement howdini interior rebecca how to
Flower Arrangements: Using Vase Filler to Create the Perfect Floral Cent...
PotteryBarn | September 15, 2010
http://www.potterybarn.com/shop/acces...
Learn how to create a simple flower arrangement with Pottery Barn Floral Designer, Nico De Swert. All you will need to create this floral arrangement is a flower vase, river rock vase filler, water, and hyacinth flowers.
Start by taking the flowers out of the container, rinse off the dirt, and take the bulbs apart. Trim the roots of the bulbs to about 1 inch long. Dump one bag of vase filler into the vase, and place the hyacinth bulbs on top. Add in your second bag of vase filler to keep the bulbs from falling over. Pour in a little bit of water, and your flower arrangement is done!
This is a beautiful, but inexpensive arrangement that makes for a great floral centerpiece. Flower arranging is a great way to bring nature into your home.
Find vases, botanicals, and vase fillers on Pottery Barn's website:
http://www.potterybarn.com/shop/acces...
Here are some other great ideas for flower arrangements:
http://www.potterybarn.com/shop/acces...
Category:
Howto & Style
Tags:
flower arrangements floral arrangements flower arrangement flower arranging floral arrangement vase filler vase fillers floral centerpiece how to arrange flowers flower arrangement ideas fresh flower arrangements fresh flower arrangement pottery barn vase vase filler ideas forsythia plants nico de swert flower vase filler pottery barn
Loading...Loading...
Flower Arrangements: How to Create a Flower Bouquet | Pottery Barn
PotteryBarn | September 20, 2010
http://www.potterybarn.com/shop/acces...
Pottery Barn Style Expert, Nico De Swert, shows us six basic flower arrangements that make simple, affordable flowers look stunning and sophisticated. These flower bouquets and centerpiece ideas can be created with fresh or artificial foliage.
1) To add texture and structure, mix some left over flower stems in with your floral arrangement.
2) Create a terrarium using one of Pottery Barn's vintage pickling jars. Terrarium plants are very easy to maintain.
3) Learn how to make a hand-tied flower bouquet with these simple steps. Arrange your flowers by twisting the stems in the same direction at a 45° angle. When you reach the desired size of your flower bouquet, tie the stems together, and drop them in a large vase.
4) For unique floral centerpieces, ground candles with floral foam and surround them with real or artificial flowers.
5) If you are creating a hydrangea flower arrangement, keep in mind that they need a lot of water. A great way to preserve hydrangea flowers is to cut the stems close to the flower and float or submerge them in a vase.
6) Add liveliness to any artificial flower arrangements by mixing real foliage in with the fake flowers.
Purchase your own Vintage Pickling Jar on Pottery Barn's website:
http://www.potterybarn.com/products/f...
Or see some more tips for decorating with flowers here:
http://www.potterybarn.com/shop/acces...
Category:
Howto & Style
Tags:
flower arrangements floral arrangements flower arrangement flower arranging floral arrangement floral centerpiece artificial flower arrangement how to arrange flower terrarium ideas how to make a bouquet flower bouquet flower bouquets floral centerpieces terrarium plants flower centerpieces plant terrarium centerpiece ideas hydrangea flowers pottery barn
Wednesday, September 29, 2010
How To Make a Shot Glass Out Of Ice
The coolest way to do a shot? Drink it from a glass made of ice.
To complete this How-To you will need:
One three-ounce plastic cup
One nine-ounce plastic cup
Water
Duct tape
Warning: Don't drink unless you're of legal age. Drink responsibly, and never drink and drive.
Step 1: Fill a large cup
Fill a nine-ounce plastic cup about one third full with water.
Step 2: Fill a small cup
Place a three-ounce plastic cup in the larger cup. Adjust the position of both cups until the smaller cup is floating on an even level with the rim of the larger cup.
Tip: When serving liquor, keep in mind that your ice shot glass will be twice as big as the average shot glass.
Step 3: Secure with duct tape
Place duct tape across the top of the two cups so the small one stays put in the center of the larger cup.
Step 4: Place in freezer
Place the cups in the freezer until the water is frozen, about four hours.
Step 5: Pop it out
Pull the small cup out of the large cup, then run the outside of the large cup under warm water until you can pop the shot glass free.
Thanks for watching How To Make a Shot Glass Out Of Ice! If you enjoyed this video subscribe to the Howcast YouTube channel! http://www.youtube.com/subscription_c...
Category:
Howto & Style
Tags:
alcohol bar drinking fooddrink glasses liquor making partying shots vodka whiskey
Friday, September 24, 2010
How To Make A Silver Vintage-Style Bead Necklace
Learn how to make a vintage necklace using silver wire and glass beads! A Beads Baubles and Jewels project. For more projects and jewelry-making know-how, visit us at http://forum.riogrande.com/ or visit http://www.riogrande.com/ for all your jewelry-making tools and supplies.
Category:
Education
Tags:
Linkables necklace vintage necklace Swanstrom Swarovski Linkables beaded necklace jewelry project how to jewelry how to how to make a necklace making jewelry jewelry making Rio Grande Beads Baubles and Jewels
How-to Make a Charm Drop Necklace, Threadbanger
simple and sweet! make your own charm necklace using the popular briolette tear drop shape. add your favorite charm and presto~
try other combinations of color and shape to!
By nicole tirona
Site: http://itsyourlife.etsy.com
simon redekop videographer
Category:
Howto & Style
Tags:
how to DIY threadbanger jewelry how-to necklace charm make drop earthday earth day NextNewNetworks
Monday, August 30, 2010
recycled magazine flowers
lcdemers | June 15, 2009
Create beautiful origami flowers with recycled magazines.
Category:
Howto & Style
Tags:
diy how to make origami flowers recycle magazines paper flowers do it yourself Kusudama decoration upcycle repurpose alamode alamodestuff
Plastic Bag Flowers
kimberlyanncrafts | September 04, 2009
Recycle Shopping Bags into Flowers using a flower loom.
Category:
Howto & Style
Tags:
recycle plastic bags flower loom flowers prym sew make craft upcycle embellish handmade homemade
Loading...
How-To Make Recycled Paper Beads, Threadbanger
ThreadBanger | July 31, 2007
Last week we got a rad video in from Becca who taught us how to make these really cool bead necklaces using old magazines and newspapers. So this week we're showing you how to make your own paper bead necklace with some old newspaper strips.
Category:
Howto & Style
Tags:
bead unique custom handcrafted handmade jewelry make making paper beads newspaper recycling diy fashion threadbanger earthday earth day NextNewNetworks
Sunday, August 15, 2010
HOW TO MAKE A SCRAP PAPER BEAD NECKLACE
SHOPCROPSUEY | July 15, 2009
What do you do with your pretty paper scraps?
Try this out!
www.shopcropsuey.com
Category:
Howto & Style
Tags:
Scrapbooking crop suey paper crafts beads
Monday, August 9, 2010
Vintage Flower Looms - CRAFT Video Podcast
makemagazine | May 23, 2008
Learn how to make straw flowers on vintage flower looms with Cathy Callahan of Cathy of California.
Category:
Howto & Style
Tags:
arts crafts make makezine howto electronics gadgets diy oreilly science technology how-to art
Thursday, July 29, 2010
Bojagi: The Tissue Box Frock
bobowrapper | March 03, 2009
A fun and easy way to dress up your tissue box. For more information please visit www.bobowrap.com
Category:
Howto & Style
Tags:
craft bojagi furoshiki reusable gift wrap green tissue box cover
FUROSHIKI : Simple Bag
hagakure1716 | June 04, 2009
Simple Bag
Category:
Howto & Style
Tags:
Furoshiki howto
Furoshiki Wrapping Shoulder Bag
From KyotoFoodie (www.kyotofoodie.com): Demonstration of how to make a shoulder bag with furoshiki
Category:
Howto & Style
Tags:
kyoto furoshiki wrapping sake bottle karakusaya
Furoshiki gift wrapping
How to wrap your presents in Furoshiki (cloth) to avoid using wrapping paper. Unlike wrapping paper (which usually can't be recycled) Furoshiki can be used again and again.
Category:
Howto & Style
Tags:
furoshiki japanese wrapping presents christmas diy howto environment green DIY
Kakefuda Kyoto - Famous Furoshiki Store
During Golden Week 2007 we visited Kyoto. During our stay we went to one of the famous traditional "furoshiki" or cloth wrapping stores. The quality and colour of the material was amazing. We even got to see the furoshiki that Mick Jagger bought last year!
Category:
Travel & Events
Tags:
Cameron Switzer Cam Cammy Japan Kyoto Golden Week Japanese Tradition Furoshiki Material Bags Culture Mick Jagger
Wednesday, July 28, 2010
Bottle cap jewelry...with Aloha from Hawaii Vintage Stickers
Debz, owner of Rubber Stamp Plantation, Honolulu, demonstrates how to make beautiful bottle cap earrings with Aloha from Hawaii Vintage Stickers. View her full line of stamps, stickers, and more at http://www.rubberstampplantation.com
Category:
Howto & Style
Tags:
bottle cap jewelry recycle rubber stamp plantation debz aloha from hawaii
Furoshiki - Reusable Grocery Bag
http://www.ungab.com/category/type/tu...
A video demonstrating how to turn a furoshiki (simple square of silk or other light weight and strong cloth) into a reusable grocery bag. This square of cloth can fold down small enough to fit into your pocket, but turn into a grocery bag twice as big as a standard bag, and much stronger.
Music: "Chipper" by Kevin Mcleod
Category:
Howto & Style
Tags:
furoshiki Bojagi Tenugui Bento ecological green resuable grocery bag small ligth simple howto how tutorial
Ku-Ku FUROSHIKI Purse2 (Cartera2)
Ku-Ku Arts & Crafts)
MUSIC: "I Like Your Purse" By Autopassion
Category:
Howto & Style
Tags:
furoshiki purse gift present japan art craft bag regalo japon arte manualidades cartera kuku fun
Ku-Ku FUROSHIKI Purse1 (Cartera1)
(Ku-Ku Arts & Crafts)
MUSIC: "First I lokk @ the purse" By Contours
Category:
Howto & Style
Tags:
furoshiki purse gift present japanese art craft regalo japones arte manualidades kuku fun
The Contours - First I Look at the Purse
風呂敷の使い方: お使い包み - How to use Furoshiki
tourokuya | August 06, 2008
http://www.tourokuya.net/
Category:
Howto & Style
Tags:
風呂敷 furoshiki
Furochic Basic Wrap
Wrapping a gift with Furochic, reusable cloth gift wrap, using the Basic Wrap technique.
Category:
Howto & Style
Tags:
Jenn Playford furoshiki wrap furochic Furochic Japanese cloth wrap cloth gift wrap fabric gift wrap fabric wrap wrap cloth furoshiki furoshiki demos holiday gift wrap eco-friendly green reuse recycle reusable cloth gift wrap
Basic Furoshiki Box Wrap - Japanese Fabric Gift Wrapping Tutorial (great...
Shiho demonstrates how to wrap any box-shaped gift with a basic furoshiki technique. Part 2 of a 3-part series on Japanese fabric gift wrapping. Check out Shiho's Green Studio blog for more info on this and other crafts: http://ecomania.wordpress.com/2009/12...
Music is "Storm" by the Yoshida Brothers.
Category:
Howto & Style
Tags:
christmas gift wrapping furoshiki japanese shiho masuda eco friendly holiday simple easy basic crafts craft ideas reusable material reuse how to wrap cloth fabric box diy presents xmas cool creative
Paper Flower Gift Bag - a DIY craft idea
Gift Bag with Paper Flower. Designed by Shiho Masuda. Music: "I'll Be Beside You," music composed by: Kazuko Mausner, piano: Kazuko Mausner, bass: Rus Wimbish, drums: Hiro Omori. Check out Kazuko's website to listen to more of her music: www.ru-piano.com
Category:
Howto & Style
Tags:
mother's mothers day gift package design bag wrapping present tissue carnation ribbon accordion fold craft crafts do it yourself diy homemade idea ideas celebration original paper flower custom howto eco-friendly romantic
Tuesday, July 27, 2010
Cake Decorating: Fun With Fondant
FYI: I am making a DVD with Robin showing how to make all kinds of fondant cakes. If you'd like to know when it's available, send me a message thru my channel page. Thanks to everybody! =)
Fondant adds a special zest to cakes, pastries, and candies. See for yourself as a cake decorator creates fun with fondant. Recipe from the episode: Chocolate Expresso Pot de Créme
To see more stories, get recipes, and links to additional resources, go to: http://cookingupastory.com/
Category:
Howto & Style
Tags:
fondant cake decorating baking stories arts crafts beauty dance drink finance technology sports music home health garden sustainable food politics environment green cooking pollan bittman kirschenmann up story
Petal Paste Techniques
www.cakebaker.co.uk has over 100 articles and videos on every aspect of cake baking.
Category:
Howto & Style
Tags:
cake bake baking petal paste decoration confectionary
How to Stencil Cakes
redbookmag | May 14, 2009
Surprise everyone with a stenciled cake!
Red Book Magazine:
http://www.redbookmag.com/?src=syn&ma...
Red Book Video:
http://www.redbookmag.com/video/?src=...
Subscribe to Red Book:
https://subscribe.hearstmags.com/subs...
-
Category:
Howto & Style
Tags:
cake stencil decorative decorate cocoa powder confectioners sugar how to
Saturday, July 10, 2010
How to make the Origami Rose
barbabellaatje | October 25, 2008
Instruction on how to make the origami rose. Only the boring pre-crease has been seriously sped-up. There are many instructions out there but this one includes 100% precreasing and the "paperclip cheat" which make creating the origami rose easier, but even so it is not for beginners... sorry! ;)
Music:
http://pacdv.com/sounds/
Category:
Film & Animation
Tags:
Origami rose instruction kawasaki,DIY,craft,projects
Created by Laibiz Creative Videos
How to make a Cherry Blossom Ku-Kusudama
Finally completed this Ku-Kusudama (not developing a stutter here...). It was inspired on Ku-Ku's Cherry Blossom Dish ;-)
I soon discovered that 5-petal flowers make great dishes but are quite over stretched. As I wanted to make a dodecahedron (a 12 pentagon ball) (ku-)kusudama I needed a 5-fold so made it with 12 10-petal flowers. Also gluing them together worked out well, the tip of the petal is almost at the perfect angle (see vid!) to make a dodecahedron :-)
Music by http://www.pacdv.com/sounds/
Category:
Howto & Style
Tags:
Kusudama paper craft flower ball 薬玉 instruction papercraft dodecahedron
DIY projects, recycle, paper
Created By Laibiz Creative Videos
Chinese Takeout Lantern - Eco-Friendly Craft Ideas by Shiho Masuda
Shiho re-orders these Chinese takeout containers into mini tabletop lanterns. As featured in NY Japion newspaper. Music: "Tang Court Ensemble" by Twelve Girls Band.
Category:
Howto & Style
Tags:
eco-friendly craft ideas shiho masuda chinese food takeout container recycled recycle materials reused reusable repurposed tabletop lantern japanese gift wrapping ny japion fun cool creative design project teen teens kids crafty making magic
Created By Laibiz Creative Videos
How to make Chinese paper lanterns
ddkim61 | June 16, 2008
Easy steps on how to make Chinese oragami lanterns.
Category:
Entertainment
Tags:
Chinese laterns paper oragami
Creative by Laibiz Creative Videos
Friday, June 25, 2010
Milk Carton Lantern - Eco-Friendly Craft Ideas by Shiho Masuda
ShihoMasuda | March 23, 2009 | 3:25
Shiho flips this empty milk carton into a pimped out tabletop lantern (as featured in NY Japion Newspaper). Please: USE BATTERY OPERATED CANDLES. LED tea lights are recommended, which you can purchase online for about $1.50.Thai unryu paper can be bought for around $3/sheet at art stores or online. It has a beautiful texture for a light shade. Song is "Skull Collector" by Tokyo Ska Paradise Orchestra
Category:
Howto & Style
Tags:
Shiho Masuda eco-friendly craft crafts idea ideas reused repurposed recycled materials used milk carton lantern unryu paper raffia newspaper fun cool creative japanese gift wrapping kids green design skull collector tokyo ska paradise orchestra
Sunday, June 6, 2010
DIY-how to make a plastic key from soda bottle.wmv
jeffxie1 — January 02, 2010 — http://www.avoidlockedout.com. this is my first prototype of plastic spare key, it works. From a soda bottle to... jeffxie1 — January 02, 2010 — http://www.avoidlockedout.com. this is my first prototype of plastic spare key, it works. From a soda bottle to the Ultimate product, please go to http://www.youtube.com/watch?v=YhGEAF...
Category:
Howto & Style
Tags:
make a key make a plastic spare key spare key DIY a key make a key from soda bottle
Thursday, April 22, 2010
Wednesday, April 21, 2010
Tuesday, April 20, 2010
Making Edible Vegetable Arrangements : Edible Arrangements: Adding Veget...
Impress your guest with a vegetable tray they won't forget! Learn how to add vegetable flowers to arrangements i...
Monday, April 19, 2010
A CUPCAKE BOUQUET with the World's Premier Culinary College
Crate a Cupcake Bouquet for this year's Mother's Day
Wednesday, April 14, 2010
Cookies Bouquet for Your Kids

Materials Needed:

Fudge-striped cookies (regular and/or mini size)
Wooden skewers (with parent supervision) Gumdrops or heart-shaped gummy candy
Green ribbon
Clear vase or clear giftwrap
These steps are so easy, I think we’ll let the pictures
“do the talking!” Let’s get started!
Step 1:

Step 2: �

Step 4:

Step 5: Wa-lah! Finished! Don’t you think the kids will have a blast making these with you?

Extra Tip: Our “stems” were too short for the length of the vase. We solved the problem real quick by simply adding more gumdrops to the bottom — of course, it also adds to the cuteness factor, too!


Yours kids will sure love to see this when they come home from school
Tuesday, April 13, 2010
Sundae Glass Candy Arrangement
You will need: a Sundae glass, a piece of stick candy, Hershey’s chocolate kisses of one flavor or several, Life Savers, curling ribbons, pipe cleaners or thin stem wire, scissors and wire cutters.
1. Find a Sundae glass you would like to use in your candy arrangement.
.jpg)
2. Fill the Sundae glass with the Hershey’s chocolate kisses
.jpg) .
.
3. Put the stick candy of the matching color into the glass.

4. (Optional). You can put Life Savers candy on the top of the Sundae (they will form whipped cream) securing them in place with glue dots or double-sided tape as necessary.


5.
a) Prepare curling ribbons of colors that correspond with the kisses wrappers. You can also buy ready-made curl swirls.

b) Take a piece of pipe cleaner or thin stem wire and tightly wrap it around the middle of the curling ribbons from step a). Curl the ribbons by pulling them over the edge of the scissors.
c) Insert the curling ribbons in the glass. Your beautiful and tasty Candy Sundae is ready!

1. Find a Sundae glass you would like to use in your candy arrangement.
.jpg)
2. Fill the Sundae glass with the Hershey’s chocolate kisses
.jpg)
3. Put the stick candy of the matching color into the glass.

4. (Optional). You can put Life Savers candy on the top of the Sundae (they will form whipped cream) securing them in place with glue dots or double-sided tape as necessary.


5.
a) Prepare curling ribbons of colors that correspond with the kisses wrappers. You can also buy ready-made curl swirls.

b) Take a piece of pipe cleaner or thin stem wire and tightly wrap it around the middle of the curling ribbons from step a). Curl the ribbons by pulling them over the edge of the scissors.
c) Insert the curling ribbons in the glass. Your beautiful and tasty Candy Sundae is ready!

This arrangement is suitable for Valentine's or Mother's Day.
Tasty Daisies
Edible fruit arrangements have become very popular these days. There are not many instructions on how to make edible arrangements on the Internet. Below you will find directions for making a fruit bouquet.
Materials used in this edible fruit arrangement: pineapple, cantaloupe, grapes, strawberries, a head of lettuce, kale leaves, bamboo skewers, gumdrops, a pot, a flower shaped metal cookie cutter, a melon baller, and a knife.
Wash and dry all the fruits and tools well before making the edible bouquet.
 Step 1. Choose a container that you would like to use for your fruit bouquet. The container used in this arrangement was bought at Wal-Mart. If you use a basket, put a plastic liner inside of it. Wash and dry the chosen container and liner before arranging fruits in it. Prepare the head of lettuce.
 Step 2. Cut the head of lettuce as necessary to fit into the container.

 Step 3. Insert the kale leaves into the container around the lettuce. Cover the lettuce completely. The kale leaves will be held in place by bamboo skewers of fruit flowers inserted later.
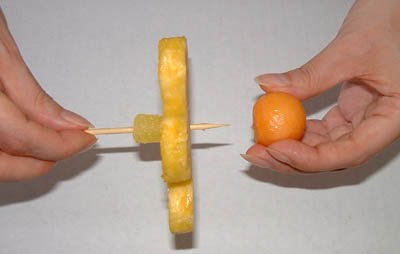
 Step 4. Make the pineapple daisies.
a) Slice a pineapple into 1/2 - 1" thick discs. I used 7 pineapple daisies for this fruit bouquet. The bigger the bouquet, the more fruit flowers you will need.

 b) Take a pineapple disc, position a flower-shaped cookie cutter over the disc, and press down on the cookie cutter. Push the part inside the cookie cutter out. Make as many as you would want. Throw away the outer portion of the pineapple.
 c) Take a cantaloupe, cut it in half and remove the seeds. Using a melon baller, cut balls from the cantaloupe. They can be totally round or a little flat on one side. Make as many melon balls as pineapple flowers.
 d) Take a bamboo skewer and slide a gumdrop onto it. The gumdrop will prevent the pineapple flower from sliding down the skewer.
 e) Pierce the sharp end of the skewer through the center of the pineapple flower. Then thread a cantaloupe ball onto the end of the skewer so that the skewer does not show. A pineapple daisy is ready.
 Step 5. Arrange your edible flowers in the pot to achieve the desired look. Make the flower stems shorter by breaking the ends off or cutting the ends off with wire cutters as necessary.
 Step 6. Make grape flowers.
 a) Take a bamboo skewer and thread several grapes onto it. Do not push the skewer all the way through the final grape. Make as many grape flowers as you would like for your edible bouquet.
b) Insert the grape flowers into the arrangement.
 Step 7. Make strawberry flowers.
a) Take a strawberry and insert the pointy end of a bamboo skewer into the strawberry. Do not push the skewer completely through the strawberry.
b) Insert the strawberry flowers into the bouquet between the daisies around the rim of the container.
 Enjoy your beautiful fruit bouquet
Materials used in this edible fruit arrangement: pineapple, cantaloupe, grapes, strawberries, a head of lettuce, kale leaves, bamboo skewers, gumdrops, a pot, a flower shaped metal cookie cutter, a melon baller, and a knife.
Wash and dry all the fruits and tools well before making the edible bouquet.


a) Slice a pineapple into 1/2 - 1" thick discs. I used 7 pineapple daisies for this fruit bouquet. The bigger the bouquet, the more fruit flowers you will need.


b) Insert the grape flowers into the arrangement.

a) Take a strawberry and insert the pointy end of a bamboo skewer into the strawberry. Do not push the skewer completely through the strawberry.
b) Insert the strawberry flowers into the bouquet between the daisies around the rim of the container.

Subscribe to:
Comments (Atom)


